Oyster Mushroom Farming: Daily Income with Under a Dollar Setup
Learn how to grow oyster mushrooms at home or in your basement on minimal budget. A practical project generating daily income without electricity or technology.
Growing mushrooms at home: Earning income for less than a dollar
The first of 12 articles in the Very Small Projects series | Survival Economics
We are always looking for simple ways to generate daily income, especially when capital is extremely limited. Oyster mushroom farming requires nothing advanced—no electricity, no large plots of land, no prior experience. Everything you need is already around your home.
Why Oyster Mushrooms Work in Low-Income Regions
Oyster mushrooms don’t compete with traditional crops. They require no fertile soil, direct sunlight, or specific season. They grow on waste: wheat straw, sawdust, dry leaves, even cardboard. Most importantly, they produce a harvestable crop within 3-4 weeks—no waiting for an entire growing season.
Oyster mushrooms are protein-rich and fiber-dense, commanding relatively high local market prices compared to most vegetables. Demand is consistent and rising, especially in urban areas. A single harvest can yield 400-800 grams from one standard-sized container.
Required Resources (Total Cost: Under $1)
Everything you need:
- Straw or sawdust: Free from wheat mills or carpenters. You can also use dried leaves.
- Mushroom spawn (mycelium): Very inexpensive, available at agricultural markets. Alternatively, propagate your own spawn from a previous harvest.
- Growing container: Old wooden box, crate, clay pot (even broken ones), or even a cloth bag.
- Water: Ordinary tap water. No special treatment needed.
- Dark, damp location: Bedroom, basement, under-stair closet—anywhere without direct sunlight.
- Spray bottle: Empty plastic bottle for misting water.
Step-by-Step Getting Started
Step 1: Preparing the Substrate (Straw or Sawdust)
Take straw or sawdust and place it in a large container. Pour boiling or very hot water over it. This kills harmful microbes that might compete with mushroom growth. Let the material cool completely (overnight).
If you lack boiling water, soak the straw in ordinary water for 2 hours, then squeeze out excess moisture. The key is dampness—moist but not waterlogged.
Step 2: Filling the Container
Place a layer of moist straw in the bottom of your container (about 5-7 cm). Then add a layer of mushroom spawn. Repeat layers: straw, spawn, straw, spawn—until the container is full. The final layer should be straw. Press layers down firmly to compress the mixture.
Step 3: Moisture and Aeration
Place the container in a dark, damp location. Mushrooms love moisture and darkness. Mist the substrate daily (morning and evening) to keep it damp but not waterlogged. Water droplets on the surface are a good sign. Ensure basic ventilation: don’t seal the container completely. Leave small gaps for air circulation.
Step 4: Mycelium Growth (Waiting Period)
Within 2-3 weeks, you’ll see fine white threads spreading through the substrate—the spawn colonizing the medium. This means growth is successful. Continue daily misting. After 3-4 weeks from start, small clusters will appear on the surface. These are mushroom pins (tiny bumps). Harvest is approaching.
First Harvest and Production
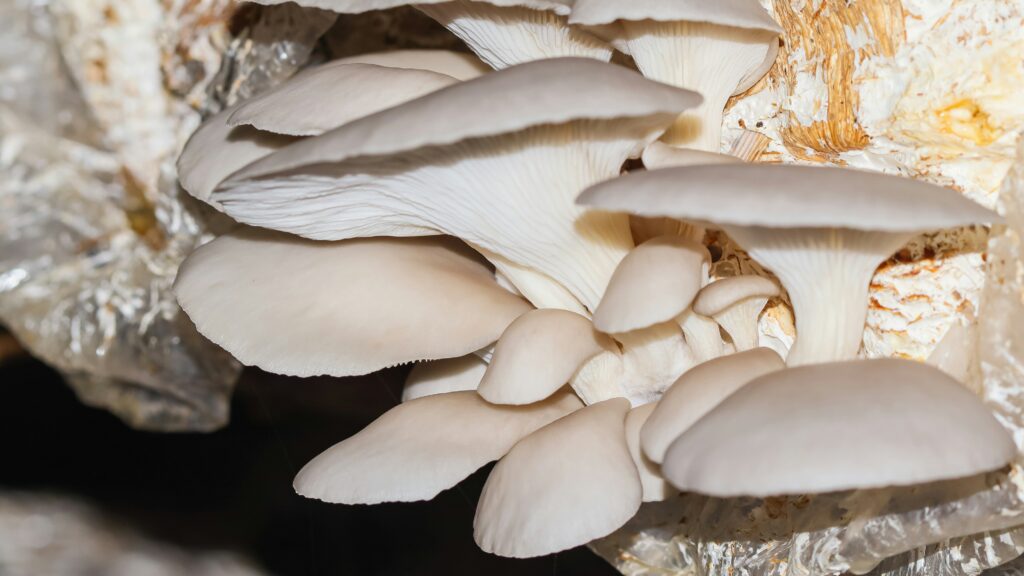
One week after the first pins appear, mushrooms are ready to pick. They resemble oyster shells—white, with slightly curved edges.
Don’t wait until they’re overgrown. Cut them with a clean knife when 7-10 cm in size. The best harvest time is when the edges begin curling slightly (early maturity).
From one medium container (a standard wooden box), expect 400-800 grams of fresh mushroom in the first flush.
Repeated Flushes
After harvesting the first flush, let the substrate dry slightly for a week. Don’t stop misting entirely—just reduce frequency. Mushrooms will fruit again. You’ll get 3-4 flushes per container before the organic material is exhausted.
Marketing and Selling Locally
Oyster mushrooms are perishable. Sell quickly after harvest—within 2 days maximum.
Where to Sell
- Local vegetable markets: Approach vegetable traders or sell directly to customers.
- Restaurants and hotels: Contact local restaurant managers. Fresh mushrooms are in demand on their menus.
- Door-to-door sales: Tell neighbors, family, friends. Word-of-mouth is powerful.
- Small grocery stores: Offer regular supply agreements (weekly, for example) at wholesale rates slightly below retail.
Pricing
Oyster mushroom prices vary by region but typically range from $2-5 per kilogram at local markets. Direct sales to restaurants may command higher prices.
Expected Profits
Per single container:
- Output: 1.5-2 kg of fresh mushrooms across 3-4 flushes.
- Income: At $3/kg = $4.50-6 per container over 8-10 weeks.
Starting with 5 containers (investment: $2-3 total), you can earn $20-30 every 2-3 weeks. That’s continuous weekly income. Scale to 20 containers (staggered phases) and you’re looking at $100+ monthly from this project alone.
Common Challenges and Solutions
Challenge 1: Green Mold Appears on the Substrate
Cause: Excessive moisture, poor ventilation, or low-quality spawn.
Solution: Reduce misting slightly. Ensure adequate airflow holes. If one container is affected, isolate it from others to prevent contamination spread. Source spawn from a reliable supplier next time.
Challenge 2: Slow Growth or No Mushrooms Appear
Cause: Weak spawn, temperature too cold (below 10°C), or insufficient substrate moisture.
Solution: Maintain temperature around 15-25°C. Buy spawn from a new reliable source. Ensure consistent moisture.
Challenge 3: Mushrooms Are Small or Weak
Cause: Insufficient aeration, too little spawn, or rapid nutrient depletion.
Solution: Improve ventilation with larger gaps. Use more spawn next time. Replace substrate entirely after 2-3 flushes.
Challenge 4: Pest Infestation (Small Insects)
Cause: Organic, moist substrate attracts some insects.
Solution: Keep the space clean. Cover containers with transparent cloth (with air holes). If insects appear, use garlic spray or simple soapy water (no harsh chemicals needed).
Gradual Expansion
After the first successful flush, scaling is straightforward:
- Produce your own spawn: Reserve part of your first harvest to propagate new spawn. This reduces future costs to nearly zero.
- Increase container count: Start with 5, move to 20, then 50. Each time, reinvest profits from the previous cycle.
- Diversify locations: Use additional rooms, basements, or even a shaded tent in the yard.
- Improve logistics: Once you have a stable routine, consider regular supply contracts with restaurants or grocery stores.
Online Growth Opportunities (Once Profitable)
If the project succeeds and profits stabilize, you can explore internet-based expansion. Share photos on social media, take orders via WhatsApp, or build a customer list. However, start locally—no additional costs required, quick cash flow, and reliable demand.
Transition to Reality
Everything explained previously is just a general introduction that outlines the basic concept without diving into the fine details. Practical methods vary depending on the location and available resources, and using unavailable supplies may result in unnecessary losses. For instance, you can start by using simple containers like used styrofoam vegetable crates from your local grocer, and then transition to specialized plastic bags when expanding; oyster mushrooms are known for their ability to push through and grow abundantly out of the slits and holes you cut into the bag. Furthermore, growing mushrooms inside apartments and urban areas lacks spacious areas, which requires utilizing vertical space by designing shelves with dimensions that match the number of bags, the height of the room, and its ceiling. Ensuring proper lighting, ventilation, and humidification requires you to condition the room environment to suit mushroom growth. When moving to commercial production, you will learn how to adapt the space using available means, such as using pumps and misting nozzles to adjust ambient air humidity without soaking the mushrooms with water, or choosing rooms with soil floors and palm thatch roofs to absorb heat, while keeping the doors open and covered with mesh screens to protect against insects. You will also need to organize the spacing between shelves to facilitate movement, harvesting, and ventilation, and rely on LED lights to provide moderate, indirect lighting for specific hours daily. You will acquire all of these skills gradually through experience and hands-on practice. If you have a passion for self-learning, platforms like YouTube will serve as a visual guide and a great asset in your practical journey.
The following clip is educational but speaks in general; you can watch videos that focus on your local environment.
How to Start a Mushroom Business: A Beginner’s Guide!
The Bottom Line
Oyster mushroom farming is one of the easiest projects to start on minimal capital. No land required, no specialized training, no seasonal waiting. In just 4 weeks, you can generate real income. Better still: you can expand sustainably using your own profits.
Start small. Try one container. If it works, add more. This is the essence of survival economics: beginning with nothing, growing wisely.
— Micro-businesses Series | Survival Economy —
Current Article: 1 – Oyster Mushroom Farming
Next Article: 2 – Home-Based Poultry Farming
References and Resources:
- FAO Guidelines on Small-Scale Mushroom Cultivation (Food and Agriculture Organization)
- Traditional mushroom farming techniques, agricultural extension services
- Local market pricing data and consumer demand surveys